【Docker】Docker machineを使用したDocker hostの作成方法【入門】

Docker machineを使用したDocker hostの作成
docker hostの確認コマンド
$ docker-machine ls
試しに実行すると起動中のhostがないことがわかります。
$ docker-machine ls
NAME   ACTIVE   DRIVER   STATE   URL   SWARM   DOCKER   ERRORS
docker hostの起動コマンド
以下は仮想化のdriverにvirtualboxを使用してdefaultという名前でhostを作成
$ docker-machine create --driver virtualbox default
コマンドを実行して見ます。
hodzumitakanori-no-MacBook-Air:DockerAutomatedBuild hodzumitakanori$ docker-machine create --driver virtualbox default
Creating CA: /Users/hodzumitakanori/.docker/machine/certs/ca.pem
Creating client certificate: /Users/hodzumitakanori/.docker/machine/certs/cert.pem
Running pre-create checks...
(default) Image cache directory does not exist, creating it at /Users/hodzumitakanori/.docker/machine/cache...
(default) No default Boot2Docker ISO found locally, downloading the latest release...
(default) Latest release for github.com/boot2docker/boot2docker is v18.09.0
(default) Downloading /Users/hodzumitakanori/.docker/machine/cache/boot2docker.iso from https://github.com/boot2docker/boot2docker/releases/download/v18.09.0/boot2docker.iso...


(default) 0%....10%....20%....30%....40%....50%....60%....70%....80%....90%....100%
Creating machine...
(default) Unable to get the local Boot2Docker ISO version:  Did not find prefix "-v" in version string
(default) Default Boot2Docker ISO is out-of-date, downloading the latest release...
(default) Latest release for github.com/boot2docker/boot2docker is v18.09.0
(default) Downloading /Users/hodzumitakanori/.docker/machine/cache/boot2docker.iso from https://github.com/boot2docker/boot2docker/releases/download/v18.09.0/boot2docker.iso...

(default) 0%....10%....20%....30%....40%....50%....60%....70%....80%....90%....100%
(default) Copying /Users/hodzumitakanori/.docker/machine/cache/boot2docker.iso to /Users/hodzumitakanori/.docker/machine/machines/default/boot2docker.iso...
(default) Creating VirtualBox VM...
(default) Creating SSH key...
(default) Starting the VM...
(default) Check network to re-create if needed...
(default) Found a new host-only adapter: "vboxnet0"
(default) Waiting for an IP...

Waiting for machine to be running, this may take a few minutes...
Detecting operating system of created instance...
Waiting for SSH to be available...
Detecting the provisioner...
Provisioning with boot2docker...
Copying certs to the local machine directory...
Copying certs to the remote machine...
Setting Docker configuration on the remote daemon...
Checking connection to Docker...
Docker is up and running!
To see how to connect your Docker Client to the Docker Engine running on this virtual machine, run: docker-machine env default
起動確認
$ docker-machine ls
NAME      ACTIVE   DRIVER       STATE     URL                         SWARM   DOCKER     ERRORS
default   -        virtualbox   Running   tcp://192.168.99.100:2376           v18.09.0
defaultの名前でdocker hostが起動しました!
hostが起動したので、このhostに接続する方法を見ていきます!
こちらのコマンドで、捜査対象のdocker hostに接続するための設定が出力されます。
$ docker-machine env default
それでは実行してみます。
下に記載のコマンド(eval $(docker-machine env default))を記載することで、まとめて環境変数を設定できます。
$ docker-machine env default
export DOCKER_TLS_VERIFY="1"
export DOCKER_HOST="tcp://192.168.99.100:2376"
export DOCKER_CERT_PATH="/Users/hodzumitakanori/.docker/machine/machines/default"
export DOCKER_MACHINE_NAME="default"
# Run this command to configure your shell:
# eval $(docker-machine env default)
やってみます。
$ eval $(docker-machine env default)
これで設定できました。簡単ですね。
では、このhost上でhelloworldコンテナを起動してみましょう!!!
docker hostでhellowoldコンテナを起動
$ docker run hello-world
Unable to find image 'hello-world:latest' locally
latest: Pulling from library/hello-world
d1725b59e92d: Pull complete
Digest: sha256:0add3ace90ecb4adbf7777e9aacf18357296e799f81cabc9fde470971e499788
Status: Downloaded newer image for hello-world:latest

Hello from Docker!
This message shows that your installation appears to be working correctly.

To generate this message, Docker took the following steps:
 1. The Docker client contacted the Docker daemon.
 2. The Docker daemon pulled the "hello-world" image from the Docker Hub.
    (amd64)
 3. The Docker daemon created a new container from that image which runs the
    executable that produces the output you are currently reading.
 4. The Docker daemon streamed that output to the Docker client, which sent it
    to your terminal.

To try something more ambitious, you can run an Ubuntu container with:

 $ docker run -it ubuntu bash

Share images, automate workflows, and more with a free Docker ID:
 https://hub.docker.com/

For more examples and ideas, visit:
 https://docs.docker.com/get-started/
実行できました!!
ではdefaultのhostにssh接続して、このhostでhello worldが実行されたことを
確認してみます。
$ docker-machine ssh default
   ( '>')
  /) TC (\   Core is distributed with ABSOLUTELY NO WARRANTY.
 (/-_--_-\)           www.tinycorelinux.net
docker ps
psコマンドでprocessを確認すると
hello worldgが実行されたことがわかります。
docker@default:~$ docker ps -a
CONTAINER ID        IMAGE               COMMAND             CREATED             STATUS                      PORTS               NAMES
8741da52aca1        hello-world         "/hello"            36 seconds ago      Exited (0) 35 seconds ago                       amazing_keller
docker@default:~$
docker hostとの接続を解除
defaultとの接続を解除しましょう!
先ほどコマンドで設定した環境変数を削除すればOKです。
$ docker-machine env -u
unset DOCKER_TLS_VERIFY
unset DOCKER_HOST
unset DOCKER_CERT_PATH
unset DOCKER_MACHINE_NAME
# Run this command to configure your shell:
# eval $(docker-machine env -u)
【Docker】githubへのビルドコンテキストのpushに伴うAutomated buildを実践【入門】
Automated buildを実践
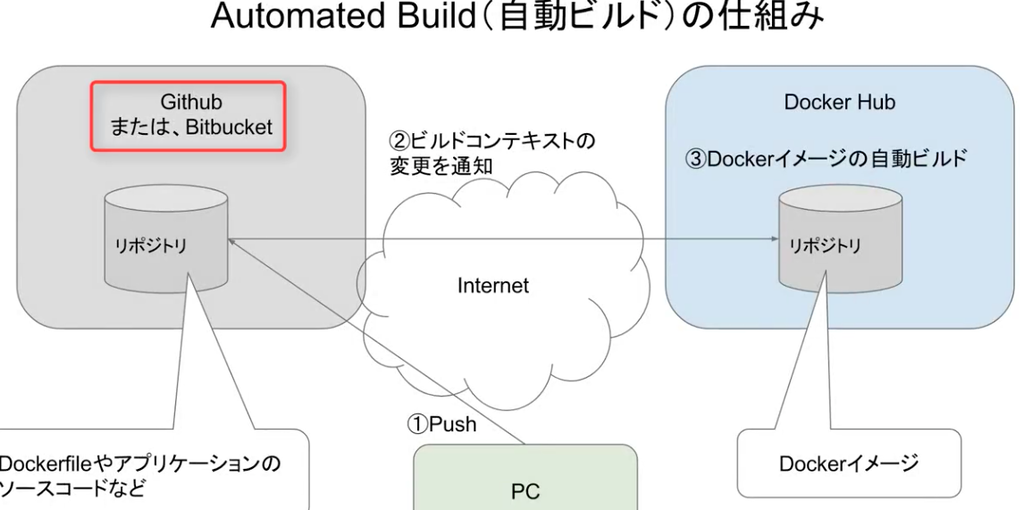
前回の設定に基づき、githubにビルドコンテキストをpush
それに伴うAutomated buildを見ていきます。
githubへのビルドコンテキストのpush
まずは空のリポジトリにDockerfileを作成していきます。
適当なDockerfileを作成
$ cat Dockerfile
FROM dockersamples/static-site
ENV AUTHOR="takanori5"
これをgithubにpush して見ます。
$ git push origin HEAD
Counting objects: 3, done.
Delta compression using up to 4 threads.
Compressing objects: 100% (2/2), done.
Writing objects: 100% (3/3), 270 bytes | 0 bytes/s, done.
Total 3 (delta 0), reused 0 (delta 0)
remote:
remote: Create a pull request for 'master' on GitHub by visiting:
remote:      https://github.com/takanorihozumi/DockerAutomatedBuild/pull/new/master
remote:
To https://github.com/takanorihozumi/DockerAutomatedBuild.git
 * [new branch]      HEAD -> master
すると、もともと以下のような状態だったDockerhubのリポジトリに
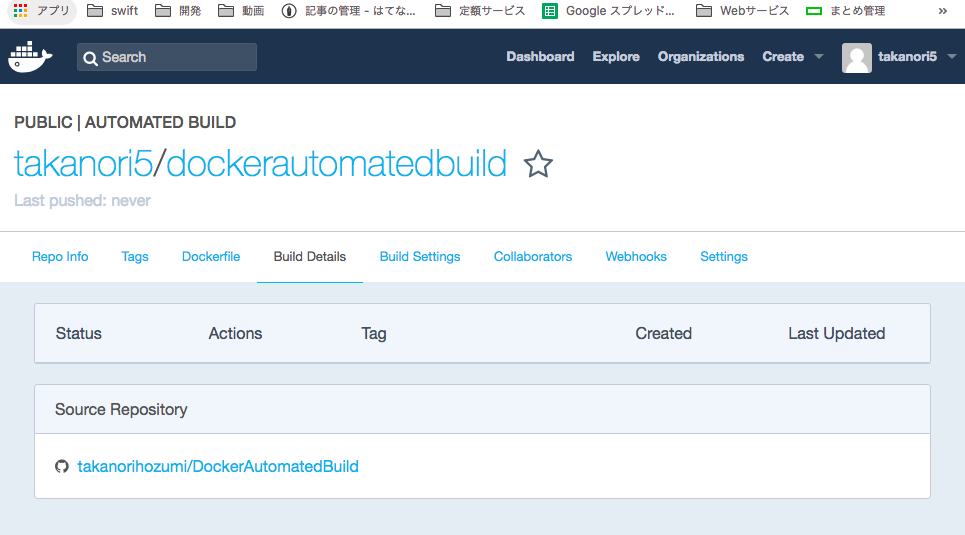
以下のように追加されていることがわかります。
まだステータスがQueuedですね
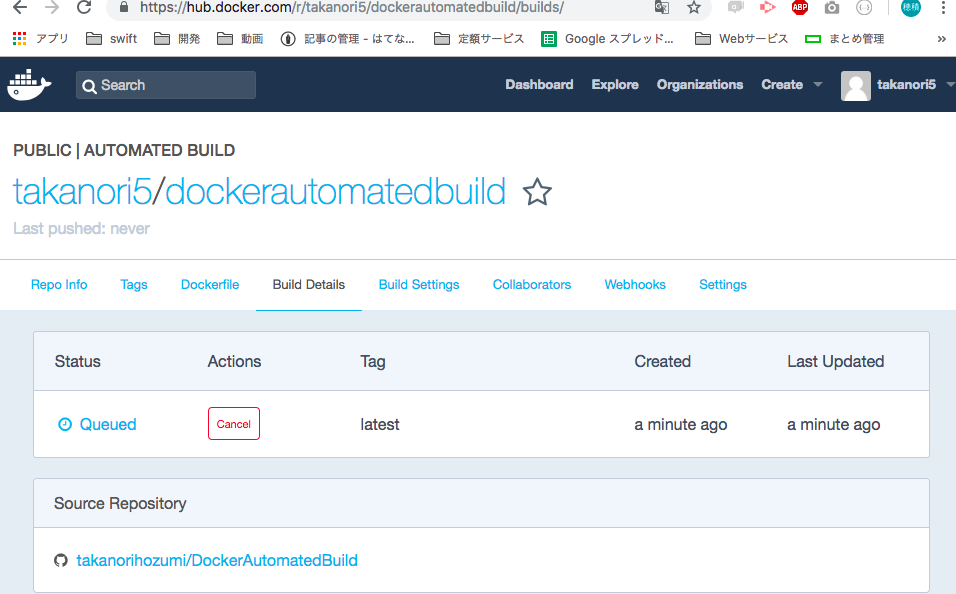
しばらく待ちステータスがSuccessとなればビルド完了です。

試しにDockerhubからイメージを取得して見ます。
取得できました!
 docker pull takanori5/dockerautomatedbuild
Using default tag: latest
latest: Pulling from takanori5/dockerautomatedbuild
fdd5d7827f33: Already exists
a3ed95caeb02: Already exists
716f7a5f3082: Already exists
7b10f03a0309: Already exists
aff3ab7e9c39: Already exists
Digest: sha256:29e35b7bdda590d8a3e6f78e22871e5aff1f90ce5bd6e52de2497313bb574617
Status: Downloaded newer image for takanori5/dockerautomatedbuild:latest
【Docker】Automated Build(自動build)の設定方法【入門】
DockerのAutomated Build(自動build)の設定方法

Automated Build(自動build)を設定していきます。
まずはgithubやbitbucketなどのホスティングサービスとリンク設定を行います。
githubとdockerhubをリンクする方法
まずはdocker hubにいきます
右上の
Create>Create Automated buildを選択します。

クリックすると、githubとリンクしていない場合は
以下のような画面が出ます。

ではLink accountsをクリックしましょう!!

githubとリンクしたい場合はlink githubをクリック!!
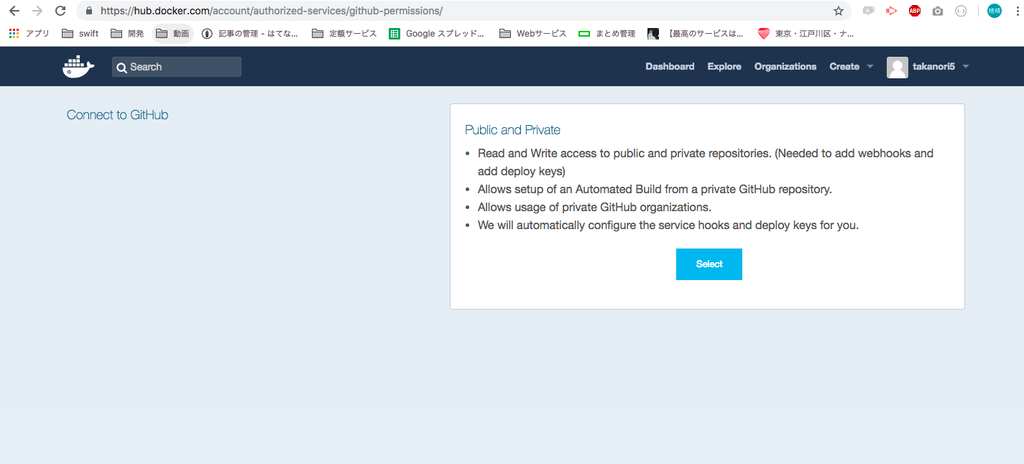
2つの選択肢が出現しました。
上はpublicとprivate両方のリポジトリに権限を与えるもの
下はpublicのみ参照権限を与えるものです。
特に理由がないなら推奨されている上の連携方法を選びましょう。
(githubのリポジトリを持っていない場合事前に用意しておきましょう!)
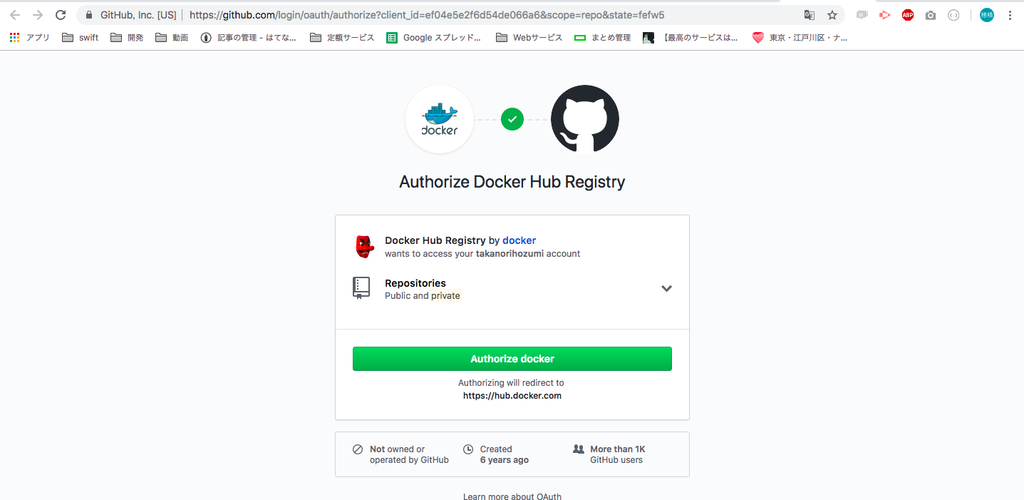
上の画面にてAuthorize dockerをクリックすれば連携完了となります。

簡単ですね!
続いてautomated buildの設定を行います。
Dockerhubのautomated buildの設定方法
右上のCreate>Create automated buildをクリックします
すると以下の画面が出ます。

create auto build githubをクリック
するとgithubのリポジトリが連携されており一覧表示されていますね。
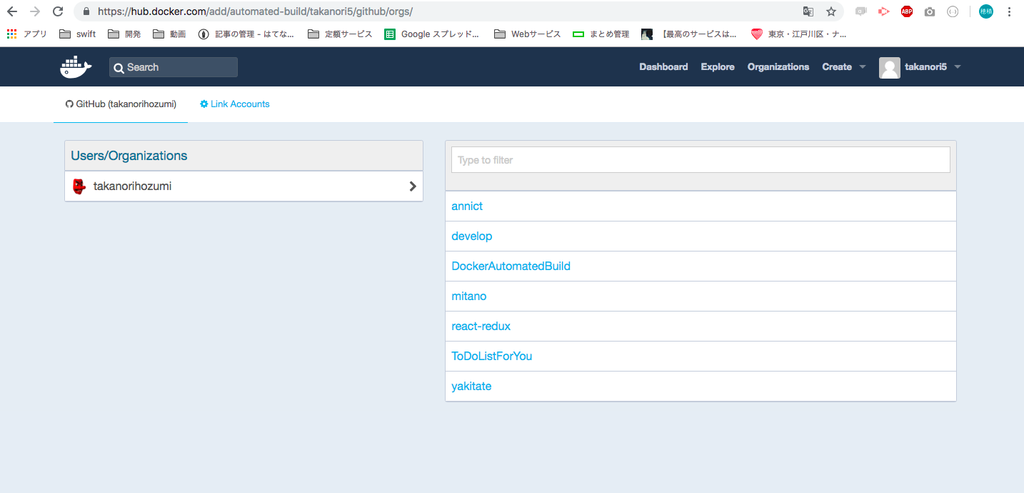
設定したりリポジトリをクリック!
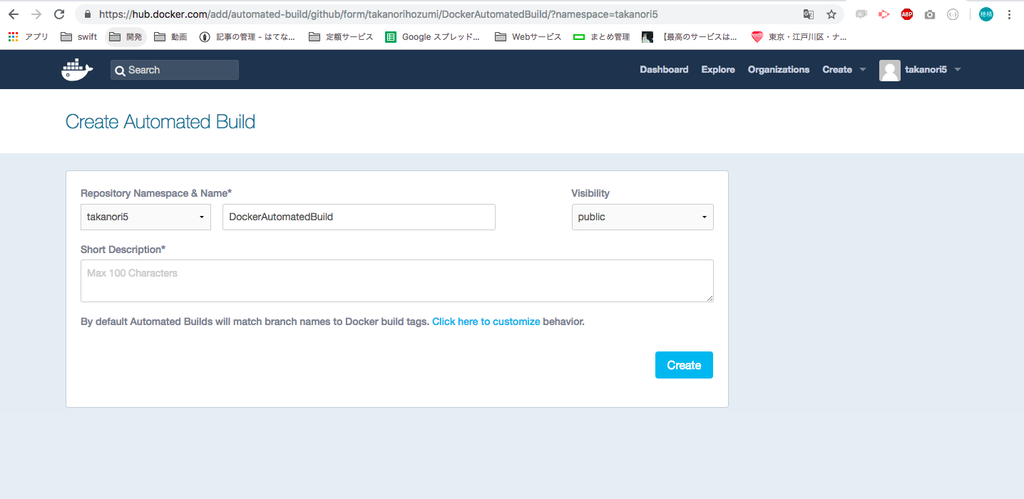
ここで設定を行うことで
設定したリポジトリに変更があった際にイメージを自動ビルドします。
入力値はとりあえずデフォルト値のままCreateをクリックします。
リポジトリが作成され、設定内容が表示されました。
簡単ですね。
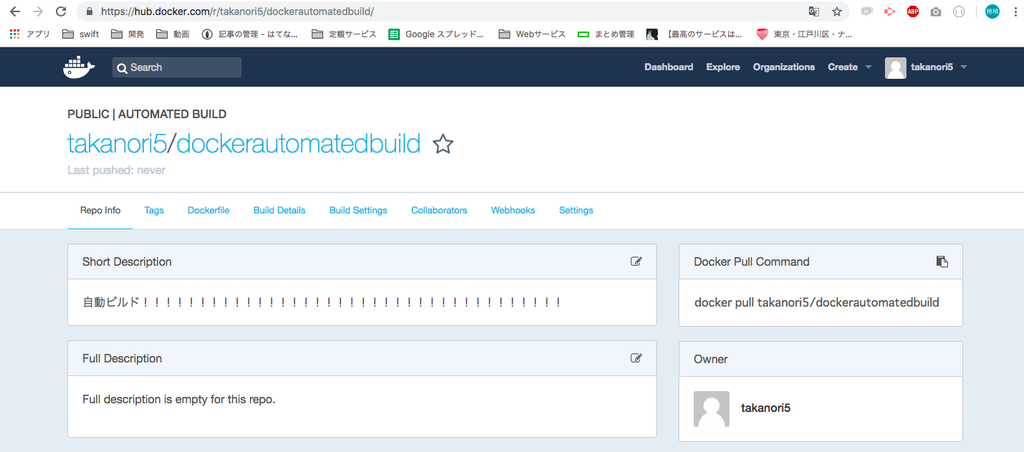
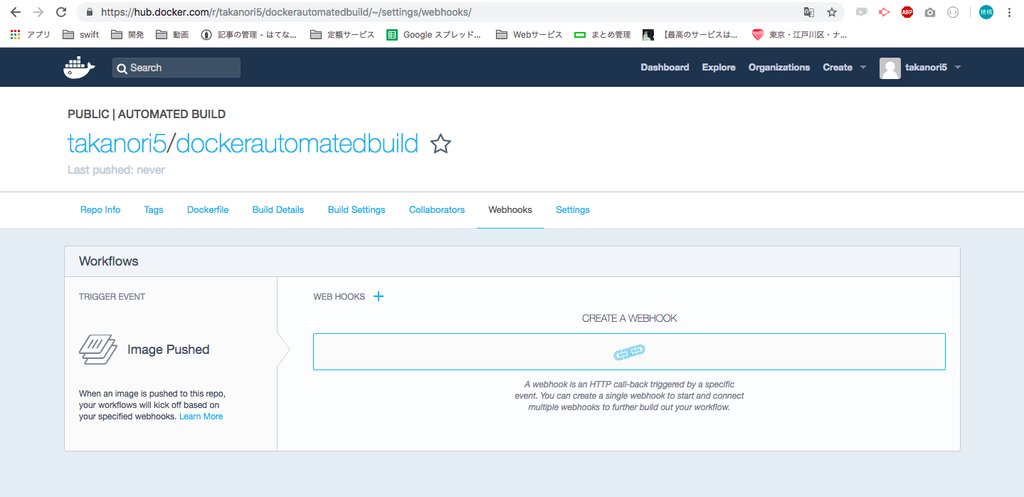
webhookタブで設定を行うと、ビルドが行われた際に
設定した先に通知を行うことも可能です。
いいですね!
【Docker】コンテナのリンクオプションとは【入門】
Dockerコンテナのリンクオプションとは

こんにちは
本日はDockerのリンク機能についてみていきます。
リンクオプションの使い方
以下のコマンドで実行可能
docker run --link <コンテナ名orコンテナID> :<リンク先コンテナの別名>...
実践
これから行うコンテナの構成図と概要
リバースプロキシコンテナとstatic siteコンテナの2つの構成を表す。
リバースプロキシコンテナからstatic siteコンテナにエイリアスでアクセスできるようにしていく
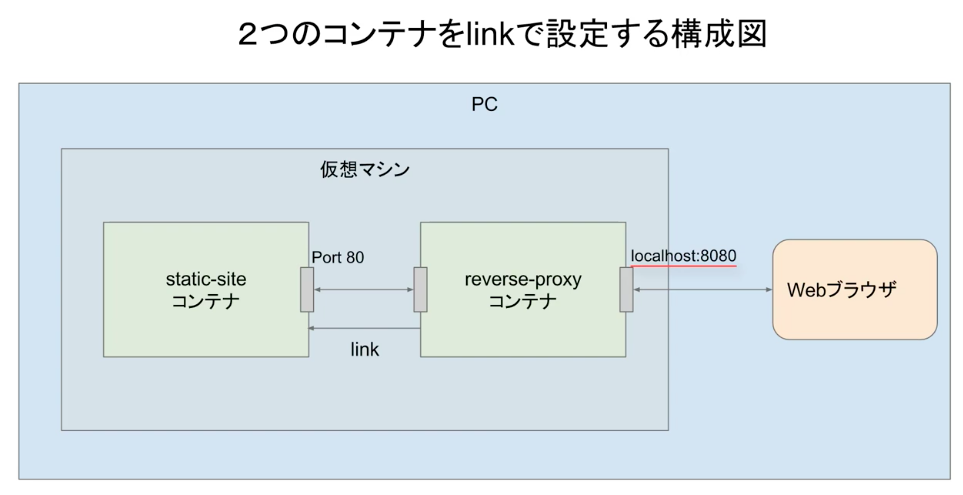
*ちなみに、このようにブラウザからサーバの間にリバースプロキシを挟むことで
複数のウェブサーバーに負荷を分散させたり、身元を隠すことが可能です。
まず、nginxの設定ファイルを作成します
nginxのconfファイル作成
$ vim reverser_proxy.conf

$ cat reverser_proxy.conf
server {
 listern 8080;
 server_name localhost;

 location / {
  proxy_pass http://ss;
 }
}
この設定により、リバースプロキシコンテナの8080ポートにアクセスがきた場合に
ssというhostにリクエストを転送する動作となる
次にこの作成した設定ファイルをnginxの設定ファイルのディレクトリに配置して
新しいイメージを作成するDockerファイルを作成していきます!!
Dockerfileの作成
$ vim Dockerfile
$ cat Dockerfile
FROM nginx:latest
COPY /reverse_proxy.conf /etc/nginx/conf.d/reverse_proxy.conf
RUN apt-get update && apt-get install -y inetutuils-ping
COPY /reverse_proxy.conf /etc/nginx/conf.d/reverse_proxy.conf
で先ほど作成したconfをnginxの設定ファイルのディレクトリに配置
RUN apt-get update && apt-get install -y inetutuils-ping
その後pingで通信確認するのに必要なパッケージを取得しています。
ではDockerfileをビルドします。
imagebuild
$docker build -t reverse_proxy .
$ docker build -t reverse_proxy .
Sending build context to Docker daemon  3.072kB
Step 1/3 : FROM nginx:latest
 ---> dbfc48660aeb
Step 2/3 : COPY /reverse_proxy.conf /etc/nginx/conf.d/reverse_proxy.conf
 ---> Using cache
 ---> 4ba07543c8af
Step 3/3 : RUN apt-get update && apt-get install -y inetutils-ping
 ---> Running in 818d2f64318c
Ign:1 http://cdn-fastly.deb.debian.org/debian stretch InRelease
Get:2 http://security-cdn.debian.org/debian-security stretch/updates InRelease [94.3 kB]
Get:3 http://cdn-fastly.deb.debian.org/debian stretch-updates InRelease [91.0 kB]
Get:4 http://cdn-fastly.deb.debian.org/debian stretch Release [118 kB]
Get:5 http://cdn-fastly.deb.debian.org/debian stretch-updates/main amd64 Packages [5152 B]
Get:6 http://security-cdn.debian.org/debian-security stretch/updates/main amd64 Packages [454 kB]
Get:7 http://cdn-fastly.deb.debian.org/debian stretch Release.gpg [2434 B]
Get:8 http://cdn-fastly.deb.debian.org/debian stretch/main amd64 Packages [7099 kB]
Fetched 7864 kB in 17s (448 kB/s)
Reading package lists...
Reading package lists...
Building dependency tree...
Reading state information...
The following additional packages will be installed:
  netbase
The following NEW packages will be installed:
  inetutils-ping netbase
0 upgraded, 2 newly installed, 0 to remove and 1 not upgraded.
Need to get 242 kB of archives.
After this operation, 390 kB of additional disk space will be used.
Get:1 http://cdn-fastly.deb.debian.org/debian stretch/main amd64 netbase all 5.4 [19.1 kB]
Get:2 http://cdn-fastly.deb.debian.org/debian stretch/main amd64 inetutils-ping amd64 2:1.9.4-2+b1 [223 kB]
debconf: delaying package configuration, since apt-utils is not installed
Fetched 242 kB in 0s (249 kB/s)
Selecting previously unselected package netbase.
(Reading database ... 7027 files and directories currently installed.)
Preparing to unpack .../archives/netbase_5.4_all.deb ...
Unpacking netbase (5.4) ...
Selecting previously unselected package inetutils-ping.
Preparing to unpack .../inetutils-ping_2%3a1.9.4-2+b1_amd64.deb ...
Unpacking inetutils-ping (2:1.9.4-2+b1) ...
Setting up netbase (5.4) ...
Setting up inetutils-ping (2:1.9.4-2+b1) ...
Removing intermediate container 818d2f64318c
 ---> 6f5bab86233d
Successfully built 6f5bab86233d
Successfully tagged reverse_proxy:latest
build成功です!
docker imagesで念のため確認しておきます。
大丈夫そうですね!
$ docker images
REPOSITORY               TAG                   IMAGE ID            CREATED              SIZE
reverse_proxy            latest                6f5bab86233d        About a minute ago   127MB
続いてstatic siteコンテナを起動しておきます。
static siteコンテナの起動
$ docker run --name static-site -e AUTHOR="Takanori5" -d dockersamples/static-site
Unable to find image 'dockersamples/static-site:latest' locally
latest: Pulling from dockersamples/static-site
fdd5d7827f33: Pull complete
a3ed95caeb02: Pull complete
716f7a5f3082: Pull complete
7b10f03a0309: Pull complete
aff3ab7e9c39: Pull complete
Digest: sha256:daa686c61d7d239b7977e72157997489db49f316b9b9af3909d9f10fd28b2dec
Status: Downloaded newer image for dockersamples/static-site:latest
6be1be9837e6b1ff70952a4c1fca4035ec4aeae6279ff4b18d441950e9ba1355
*-eは引数の環境変数を設定するオプション
このページではAUTHORという環境変数に名前を設定しておくとそれが静的ページに表示される仕組みとなっています。
次に、先ほど作成したリバースプロキシイメージから
コンテナを起動します
リバースプロキシイメージからコンテナを起動
$ docker run --name reverse_proxy  -p 8080:8080 --link static-site:ss -d reverse_proxy
226d3824bfdb0b5a02498e8354740c8b4542598ae3a7a339c5d60b2ae6902c39
このコンテナは8080番ポートを外部に公開し、
staticsiteコンテナにリンクして、エイリアスとしてssという名前を付けています。
起動中のプロセスを一度確認します。
$ docker ps
CONTAINER ID        IMAGE                       COMMAND                  CREATED             STATUS              PORTS                            NAMES
4b70064342f6        reverse_proxy               "nginx -g 'daemon of…"   5 seconds ago       Up 4 seconds        80/tcp, 0.0.0.0:8080->8080/tcp   reverse-proxy
6be1be9837e6        dockersamples/static-site   "/bin/sh -c 'cd /usr…"   12 minutes ago      Up 11 minutes       80/tcp, 443/tcp                  static-site
2つのコンテナが起動できました。
コンテナの動作確認
では、2つのコンテナの動作確認をしていきます!!
まずはブラウザでローカルホストの8080にアクセスしてみます。
http://localhost:8080/
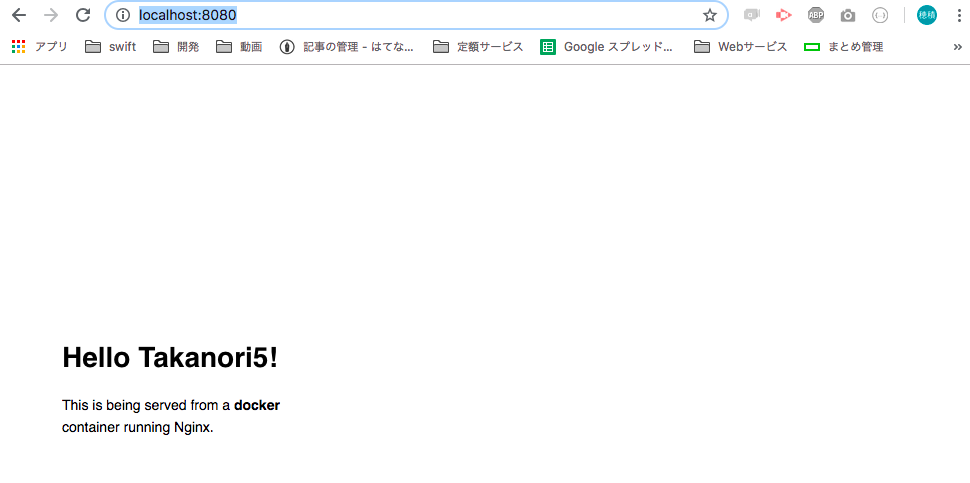
このWebページはリバースプロキシを経由してstaticsiteコンテナにアクセスすることで取得しています。
では、リバースプロキシコンテナにシェル接続してリンクによる設定を確認してみます。
$ docker exec -it reverse-proxy /bin/bash
root@4b70064342f6:/#
まずは、どのようにしてstaticsiteやssというエイリアス名で通信先を特定できたのか確認します。
hostファイルを見ます。
root@4b70064342f6:/# cat /etc/hosts
127.0.0.1	localhost
::1	localhost ip6-localhost ip6-loopback
fe00::0	ip6-localnet
ff00::0	ip6-mcastprefix
ff02::1	ip6-allnodes
ff02::2	ip6-allrouters
172.17.0.4	ss 6be1be9837e6 static-site
172.17.0.5	4b70064342f6
172.17.0.4 ss 6be1be9837e6 static-site
ここで名前解決していますね。
これがリンク機能の一つです。
続いてenvコマンドで環境変数の設定を見ていきます。
/# env |grep SS_
SS_ENV_NGINX_VERSION=1.9.12-1~jessie
SS_PORT_443_TCP_ADDR=172.17.0.4
SS_PORT_80_TCP=tcp://172.17.0.4:80
SS_PORT_443_TCP=tcp://172.17.0.4:443
SS_ENV_AUTHOR=Takanori5
SS_PORT_80_TCP_PROTO=tcp
SS_PORT=tcp://172.17.0.4:80
SS_PORT_443_TCP_PORT=443
SS_PORT_80_TCP_ADDR=172.17.0.4
SS_NAME=/reverse-proxy/ss
SS_PORT_443_TCP_PROTO=tcp
SS_PORT_80_TCP_PORT=80
author変数に値が設定されていますね!
この環境変数はreverse-proxyコンテナに明示的に指定していませんが、
リンク先コンテナに指定しているものなので
リンク機能により自動で設定がされています!
便利ですね!!
これらがリンクの機能です!
コンテナ名の名前解決はリンクを使わなくても
Dockerのネットワークを作ることで実現できるので
ここで見たように環境変数を注入したい時だけ使うといいみたいです。
今回は以上です。
【Docker】起動中のコンテナのシェルへの接続方法【入門】
起動中のDockerコンテナのシェルへの接続方法

以下の二つの方法で接続可能
docker attach コンテナ名
docker exec -it コンテナ名 /bin/bash
docker attach コンテナ名
コンテナで起動しているPID=1のプロセスの標準入出力(STDIN/STDOUT)に接続(attach)する。
docker exec -it コンテナ名 /bin/bash
dockerコンテナで任意のコマンドを実行させる。
- itオプションについては意味合いは以下の通り
i 標準入力(STDIN)を開いたままにする
t 擬似ttyに接続する。ディスプレイ(STDOUT)をつなぐイメージ
execの方が 不意にコンテナが止めてしまったりといったことが起きづらいためこちらを推奨
【Docker】コンテナのライフサイクル【入門】
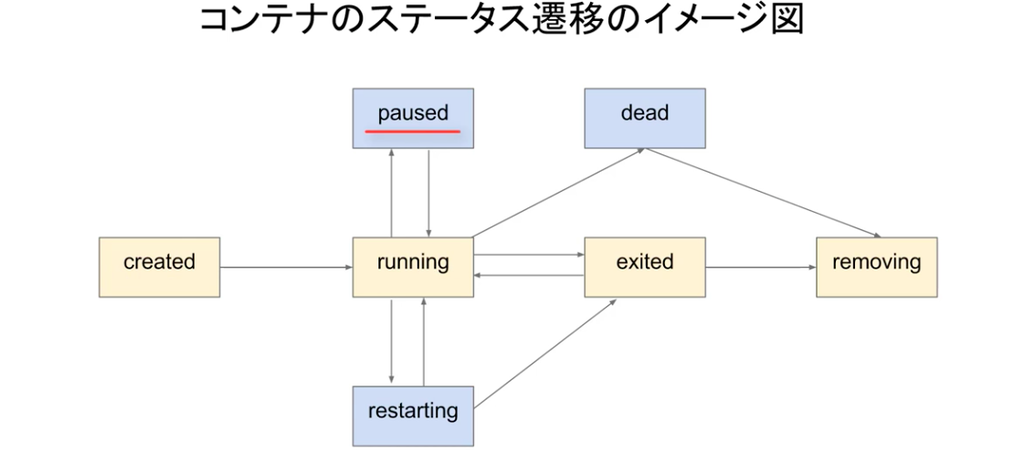
コンテナのライフサイクル

コンテナとはDockerイメージのファイルシステムを元に作られる一種の仮想環境。
コンテナはホストマシンの1プロセスとして動作する
docker runコマンドでは
createdからのrunningまでをまとめて行なっている
